Building an Aviary
..build your own indoor aviary
by Myra
Articles and Information - Lady Gouldian Finch
You wouldn't know it now, but like most people I started out with a single bird, a male zebra finch. It wasn't more than a month later when I decided I'd like to buy a female for him.. Two birds quickly became four, then six, and so on. Many years later I have a flock of around 80 finches.
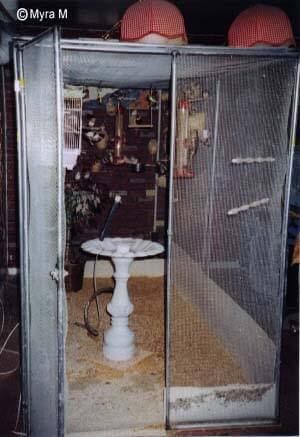 Myra Markley (FinchNiche) photo of Aviary Myra Markley (FinchNiche) photo of Aviary
I started out with a cage for each pair but after my flock grew to 8 pairs I realized I was running out of space to put cages. I also found that I was spending a lot more time cleaning cages and changing food and water for the birds than I liked.
I tried buying a few large cages for my pairs to share. That led to some fighting, though nothing serious, only a few plucked feathers. At the time I really had no idea what size a cage should be used to house a few pairs of finches, but now I know the flights were small and that I had some very aggressive females.
After talking with other local finch breeders, I decided to try an aviary. This aviary would allow my finches plenty of room and fulfill my one greatest wish; to be able to stand amongst my finch friends.
The reality of the cost set in. One small walk-in aviary could cost from $500-$1000. I don't breed birds for a living, and there was no way I could afford that so I talked the design over with my father and uncle and they agreed to help.
My homebuilt aviary cost about $250. It was built over a period of 2 weekends and assembled in my basement [because that was the only place it would fit, and it allows me to give the birds proper lighting]. It stands 5'5' tall [I'm a short gal, I have no problem standing up in this aviary], it's 4' wide and 8' long. I use hanging bird feeders for their seed, and a small fountain that supplies fresh water constantly. I also installed large removable bowls [the kind you buy for T-Stands and Parrot Cages] to hold the fruits, veggies, egg, and other treats.
If you are interested in building one of your own feel free to use my design as a guide:
Flight area building supplies:
- 17 - 10' sections of 1/2" thin wall Electrical Conduit
- 1 - 50' roll of 1/4" hardware cloth
- 34 - 2" #8-32 steel machine screws and nuts
- 100 - 1/2" #8 PH wafer k-lath screws
- 2 - small hinges
- 1 - door latch
- 1 - 4x8 foot sheet of plywood
- 1 - 4x8 foot panel of slick surfaced masonite
- 1 - latch or locking mechanism
|
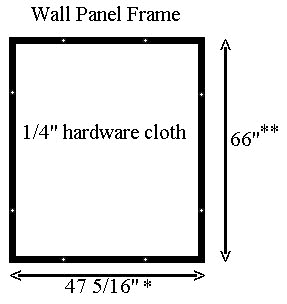 Wall Panel Frame - How to Build an Aviary by Myra Markley
Walls: Wall Panel Frame - How to Build an Aviary by Myra Markley
Walls:
This is the main framework of my aviary. All side panels [as shown] are interchangeable. Screw holes are shown as small dots on the frame . Holes on top and bottom are drilled vertically and holes on the sides are in both directions as needed.
The corners are cut at an angle and welded together like a picture frame.
Height in my aviary is 66 inches
(** Though you can make yours as tall as you need)
Width in my aviary is 47 & 5/16 inches
(* Subtract the diameter of structural component)
Cover from with hardware cloth and screw tightly into place. |
Door:
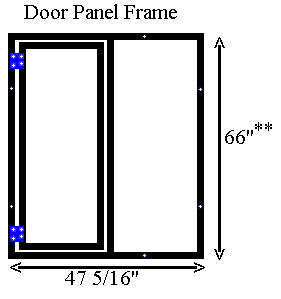 Door Panel Frame - How to Build and Aviary by Myra Markley
The panel with the door has the exact same dimensions as the wall panel. The only difference is the door is mounted in this panel. Door Panel Frame - How to Build and Aviary by Myra Markley
The panel with the door has the exact same dimensions as the wall panel. The only difference is the door is mounted in this panel.
The hinges can be any type of hinges that you can find and that will work easily with your aviary design. They must be mounted on the outside unless you really want the door to swing in.
Fit the door as tightly as possible to the frame so none of your birds can sneak out or get stuck half way through during an escape attempt. |
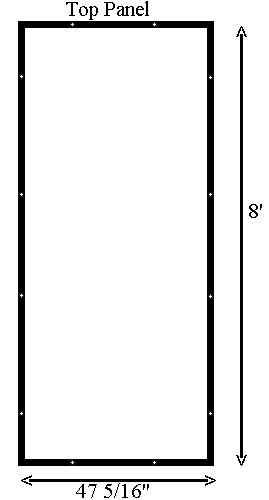 Top Panel - How to Build and Aviary by Myra Markley
Top/Roof Panel: Top Panel - How to Build and Aviary by Myra Markley
Top/Roof Panel:
The top panel is one large panel.
All the little screw holes are where the top panel is fitted to the wall panels. The screw over the door itself may not fit and still allow the door to swing freely. I have just removed the screw in that one place on my aviary for that very reason.
|
Once assembled without the top panel on the aviary will look kinda like this (looking down on aviary)
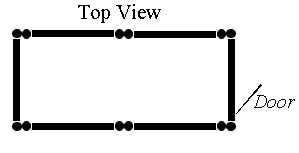 Top view - How to build an Aviary by Myra Markley Top view - How to build an Aviary by Myra Markley
Catch Area-
I don't have a catch area on my aviary because it is kept inside, but adding one would not be hard. Just build 2 more wall panels and 1 more door. They assemble any way you like. All the panels are interchangeable except for the top. For the top panel you'll had to build another wall panel or make the original top longer.
Building Notes:
- Assemble panels using the 2" #8-32 steel screws and the #8-32 nuts
- Attach hardware cloth to panels using #8 1/2" PH Wafer K-LATH screws
- The heads of these screws are large and will not go through the hardware cloth
- The floor is a piece of plywood screwed to the framework with Masonite on top for easy cleaning.
|
Fountain -
The fountain has gone through two phases.. It started out as a large bucket of water and a small pump that circulated water. The water ran over two small plates and drained back into the bucket through a few small holes. This, however, required someone to change the water in the bucket everyday.
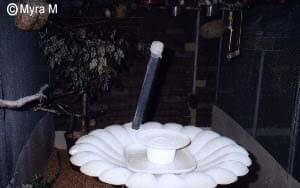 Water Fount - How to Build and Aviary by Myra Markley Water Fount - How to Build and Aviary by Myra Markley
Finally my father and I redesigned it to constantly have fresh water running into the aviary. This is really a kludge but it does work very well for me.
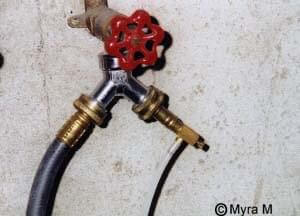
First we needed some tubing. One hose is a food grade polypropylene tube that runs the water from the house to the aviary. I used the food grade tube because it won't rot or break down and poison my birds. I also used a larger polyethylene tube to run from the fountain to the drain in the basement floor. It doesn't really matter what you use for the second tube as long as it's big enough that the seed and droppings won't clog it up.
 Water - How to build an Aviary by Myra Markley Water - How to build an Aviary by Myra Markley
To adjust the amount of water flow into the aviary we used a needle valve. This valve isn't something you can find at your local hardware store unfortunately. I acquired mine through my uncle. From what he has told me, it came out of an old 8-track winding assembly machine. It does work very well tho. Just the slightest turn will adjust the flow of water from a few drips a second to a steady stream.
The fountain itself is just a bird bath. I bought it at the hardware store when I picked up the tubing. A few old plates and a drain finish it off. [see photo]
The best advice I can give you is to experiment, be creative. As you can see by mine, aviaries don't have to cost a small fortune to build. |
© lady gouldian finch.com 2017